Debugging crappy internet connections from the command line
Recently, I switched broadband provider (from Virgin to Hyperoptic). I noticed my new router was losing connection in weird ways every morning, and it turned out to be something to do with a recent IPv6 rollout in my apartment block, easily fixed (apparently!) by disabling some part of the IPv6 handling in my router.
Knowing that there’s nothing worse than a vague “my internet’s not working” support call, I did a bit of digging before I called the support line, just to gather some concrete statistics and help them diagnose what might be going wrong.
Here’s my record of the things I tried, and things I learned. Hopefully they’ll come in handy next time I—or you!—need to debug network connections again.
Checking for an internet connection
8.8.8.8 is Google’s DNS server, so it’s pretty likely to be accessible to you—at least in Europe and the US—at all times. ping is a handy utility that tests how long it takes for a message to reach a server and come all the way back.
ping 8.8.8.8
If you run ping 8.8.8.8 and you don’t see packets returning, chances are you’re not connected to the internet.
If you run ping 8.8.8.8 and get time= values of 100 ms (milliseconds) or more, that could explain why web pages load slowly, or video/audio streaming is choppy. Really you want a ping time of 50 ms or less. 10 ms is excellent.
I tend to run ping in combination with the ts command,1 which prepends the current timestamp onto each line of output, so I can leave the command running in the background and diagnose when particular slowdowns took place over a long period of time:
ping 8.8.8.8 | ts
Checking specific ports
Combining Netcat and the unbelievably useful portquiz.net service, you can quickly and easily test whether any of the routers between you and the internet are blocking any ports:
nc -v portquiz.net 80
nc -v portquiz.net 25
You’re looking for a success message like “Connection to portquiz.net port 25 [tcp/smtp] succeeded!”
If some things on your device are working (like browsing web pages) but others aren’t (like fetching or sending emails using a proper email client) then checking for blocked ports is a good starting point.
Common protocols and ports
| Use | Protocol | Port |
|---|---|---|
| Web browsing | HTTP (unsecure) | 80 |
| HTTP over SSL | 443 | |
| Fetching email | IMAP (unsecure) | 143 |
| IMAP over SSL | 993 | |
| Sending email | SMTP (unsecure) | 25 |
| SMTP over SSL | 465 |
(See a full list on Wikipedia)
Test download speed
Leave those crappy web-based speed testers at home. Do it from the command line:
wget -O /dev/null http://speedtest.wdc01.softlayer.com/downloads/test100.zip
wget -O /dev/null http://speedtest.wdc01.softlayer.com/downloads/test500.zip
The first one downloads a 100 MB file, the second a 500 MB file.
If you don’t trust the source of the files (or suspect that your broadband provider might artificially speed up requests to common speed testing sites, just to make their numbers look good – it happens!) then you can upload the files to your own web server, and try downloading them from there.
If you don’t have wget installed (and don’t want to brew install it) you can use curl -o /dev/null … instead.
Megabits and megabytes
When you’re looking at the live and average download speeds, bear in mind that 1 MB/s (megabyte per second) equals 8 Mbps (megabits per second).
So, if your broadband provider says they offer you “100 meg internet”, they mean 100 Mbps, and you should theoretically be seeing a transfer speed of around 12 MB/s during this test.
In reality, your transfer speed will often be a little lower than the theoretical maximum promised by your ISP… but it should still be somewhere near it.
Poll for wifi network signal (RSSI) and noise
This one was all new to me. Since I’d just got a new router, I was keen to test the wifi coverage in different rooms of my apartment.
The Mac comes with a built-in wifi network diagnostics tool, but it’s kinda hidden away. This command wraps it in watch -n 1 so that the output updates every second:
watch -n 1 /System/Library/PrivateFrameworks/Apple80211.framework/Versions/Current/Resources/airport -I
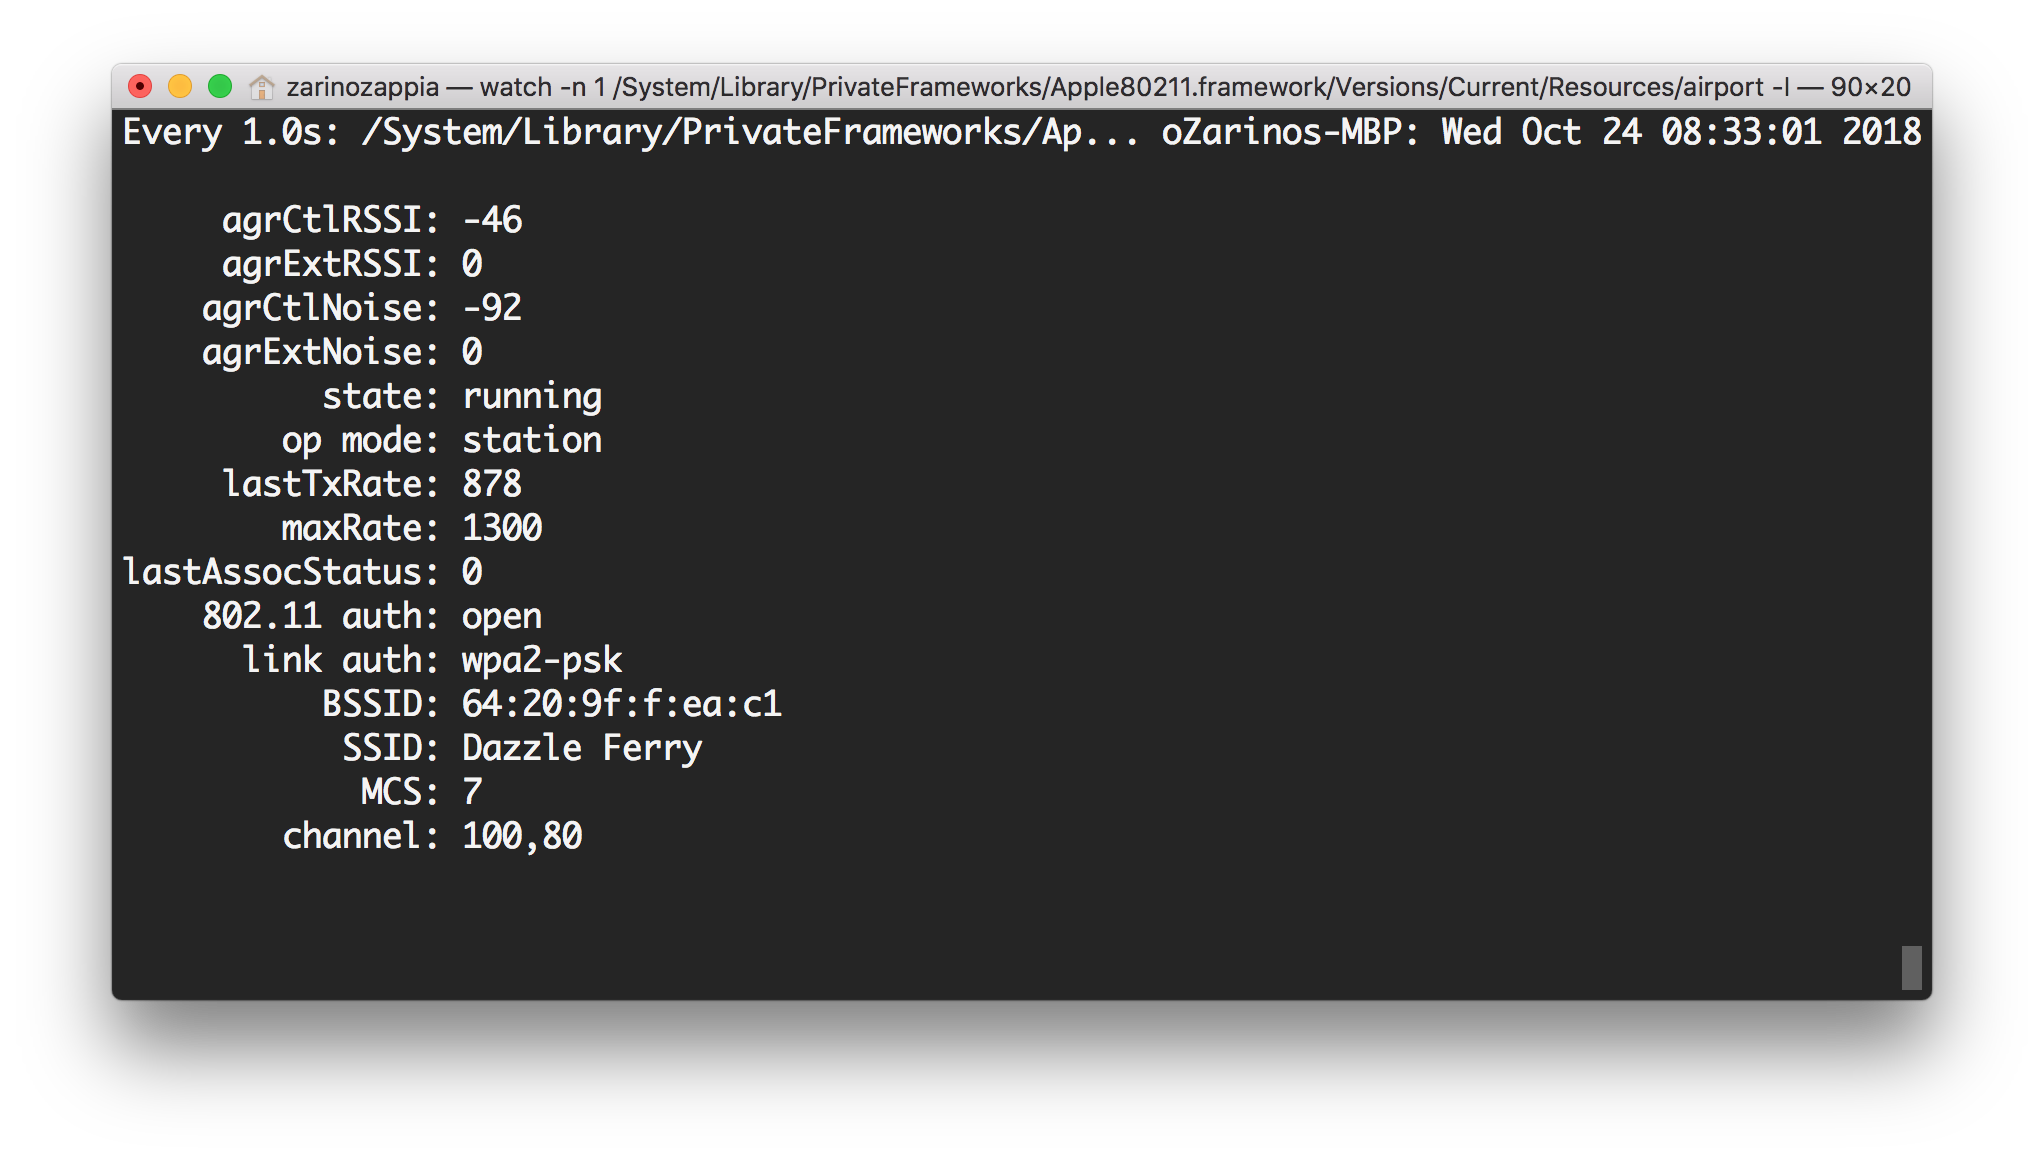
To get a feel for how “strong” your wifi connection is, subtract your agrCtrlRSSI (eg: -50) from your agrCtrlNoise (eg: -100). It helps to just ignore the minus signs. That gives you a “Signal to Noise Ratio” or SNR. You want an SNR of at least 25 for data-heavy applications like streaming. An SNR of 40 or more is excellent.
When you’re done, you can exit watch by pressing ctrl–C.
How wifi noise works
RSSI and Noise are negative numbers,2 measured in dBm, or decibel-milliwatts. A decibel-milliwatt is a measurement of literally how much power is flowing through the air, on a logarithmic scale. So doubling the negative dBm value halves the power (eg: -3 dBm = 0.5 mW but -6 dBm = 0.25 mW). By the time we get to typical wifi signal strengths (like -50 dBm) we’re talking tiny tiny fractions of a milliwatt.
That’s why it’s unusual to see a signal between -30 dBm and 0, because that would require huge power from the transmitter. That also explains why you want your Noise to be around -100 dBm, because—thanks to the logarithmic scale—that’s a really infinitesimally small background noise.